Katana Disassembly
A proper katana can be disassembled for inspection, repair, or a thorough
cleaning. It is also fairly easy to customize you katana by swapping
tsuba. This guide will walk you through the process of disassembling and
reassembling your katana or wakizashi. This process involves handling the
bare blade and great care must be given to avoid injuring yourself. This
process may damage soft mekugi pegs so make sure you are ready to replace them
if needed.
Nihonzashi LLC, its employees, and associated
companies are not responsible for any injury, damage or loss incurred by
following any advice given on this site. Katana are dangerous objects and
the utmost care should be given when working with them.
|
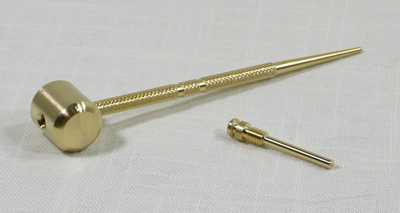
Mekuginuki: Mekugi (peg) removal tool. The standard mekuginuki has
a punch that unscrews from top of the hammer. A brass hammer or wooden
mallet and a punch can also be used. We do not recommend that steel
tools be used that could damage the blade. |
 |
|
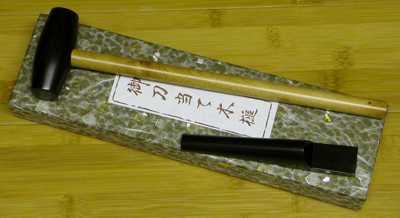
Hammer and Splint: Used to remove stuck tsuka (handles). While some
tsuka are easy to remove, other seem to be hammered on by the
manufacturer. A brass hammer or wooden mallet and a bamboo or hardwood
splint can be used. |
 |
| Washcloth: Clean washcloth or 1 foot x 1 foot piece of
an old towel. Expect this to become damaged so use something
appropriate. |
| Softwood Block: This should be a piece of scrap wood at
least 4" x 4" x 1". It should be a softwood like pine. |
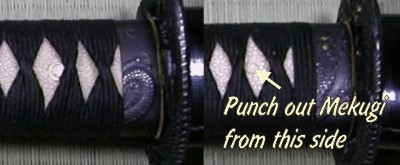
Katana have from one to three mekugi (bamboo pins) securing the tsuka
(handle) to the nakago (tang). These should be hard bamboo on a shinken
(real sword) used for martial arts practice. Hardwood and Buffalo horn
mekugi are not recommended for swords that will be used for that purpose.
Proper mekugi are tapered and can only be removed in one direction. The
should be oriented so that the palms of your hands are over the larger end of
the mekugi, but your katana may have straight mekugi or they may be backwards.
The small end of the mekugi may also be hidden under the tsuka-ito (handle
wrap).
 The
standard Mekuginuki
(mekugi removal tool) is a small brass hammer that has a punch that unscrews
from top of the hammer. A brass hammer or wooden mallet and a punch can
also be used. We do not recommend that steel hammers be used that could
damage the blade. The punch is used to drive the smaller end of the mekugi.
Mekugi made of soft bamboo are often damaged when inserted or removed.
This is a good opportunity to inspect mekugi for any damage and replace them.
Check out the Mekugi
Replacement page for more information. The tsuka-ito (handle wrap) may
need to be pushed aside if the mekugi ana (peg hole) is under it. Make
sure to note which mekugi is which since they may be slightly different. The
standard Mekuginuki
(mekugi removal tool) is a small brass hammer that has a punch that unscrews
from top of the hammer. A brass hammer or wooden mallet and a punch can
also be used. We do not recommend that steel hammers be used that could
damage the blade. The punch is used to drive the smaller end of the mekugi.
Mekugi made of soft bamboo are often damaged when inserted or removed.
This is a good opportunity to inspect mekugi for any damage and replace them.
Check out the Mekugi
Replacement page for more information. The tsuka-ito (handle wrap) may
need to be pushed aside if the mekugi ana (peg hole) is under it. Make
sure to note which mekugi is which since they may be slightly different.
If you can not find any mekugi on your katana, it may not have a removable
tsuka.
The kissaki (point) should be kept pointed up once the mekugi are removed
since the blade can slip out if it is loose. This is an important safety
rule! Once the mekugi have been removed, the tsuka (handle) is ready to be
taken off. This may be a simple process if the tsuka is not too tight.
The katana needs to be removed from the saya. With the kissaki (tip of
blade) pointed upward grasp the tsuka (handle) with both hands. The ha
(edge) should be towards you and your right hand should be just below the tsuba
(guard). Push on the tsuba with your right thumb. If you are lucky
the blade will pop loose and you can skip the next section.
 Most
production katana have the tsuka stuck tightly to the blade. Use a clean
dry washcloth or a 1 foot x 1 foot piece of an old towel wrapped around the
blade to protect it and make it easy to grip the bare blade. It should be
tight so it does not slide (and slice) and positioned next the to habaki (blade
collar). Lay the blade flat on a table or counter top with the tsuba
(guard) hanging off the edge. Hold the blade in place with your left hand.
A hammer and splint are used to forcibly loosen the tsuka. Use your right
hand to place the splint and tap with Most
production katana have the tsuka stuck tightly to the blade. Use a clean
dry washcloth or a 1 foot x 1 foot piece of an old towel wrapped around the
blade to protect it and make it easy to grip the bare blade. It should be
tight so it does not slide (and slice) and positioned next the to habaki (blade
collar). Lay the blade flat on a table or counter top with the tsuba
(guard) hanging off the edge. Hold the blade in place with your left hand.
A hammer and splint are used to forcibly loosen the tsuka. Use your right
hand to place the splint and tap with
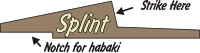 the
hammer. The splint is placed on the side of the habaki (blade collar)
against the seppa (spacer). the
hammer. The splint is placed on the side of the habaki (blade collar)
against the seppa (spacer).
Once the blade has been loosened it can be handled by the nakago (tang).
The seppa (spacers) and tsuba (guard) should be loose. Make sure you know
which seppa is placed against the habaki (blade collar) and which is against the
tsuka. One should match the size of the tsuka while the other should match the
saya. There will probably be an impression of the habaki on the seppa that
goes on that side of the tsuba. The orientation of the tsuba should also be
noted. The front of the tsuba usually faces the tsuka (handle).
The habaki (blade collar) is often stuck on the blade. It is easy to
damage the habaki and you need to be careful when removing it. Use a block
of hardwood slid along the blade to tap the habaki off the nakago.
The habaki (blade collar), seppa (spacers), and tsuba (guard) and slipped
back on the nakago. They should be pushed onto the nakago (tang) as far a
possible, but they may not go all the way on. The tsuka (handle) is held
upright and the nakago is slipped in. The tsuka is held with the kissaki
(point) of the blade up. The kashira (end cap of the handle) is tapped
against a softwood block to tighten the fittings. This process uses the
weight of the blade to force the fittings into place. The mekugi are put
back in and tapped tight with the mekuginuki. The mekugi should be flush
with the same (ray skin) of the tsuka.
|